
You’re offline. This is a read only version of the page.


The XMLA Endpoint for Power BI Premium datasets reached general availability in January 2021. The XMLA endpoint is significant to developers because it provides new APIs to interact with the Analysis Services engine running in the Power BI Service and to directly program against Power BI datasets. A growing number of Power BI professionals have found that they can create, view and manage Power BI datasets using pre-exisitng tools that use the XMLA protocol such as SQL Server Management Studio and the Tabular Editor. As a .NET developer, there's great news in that you can now write C# code in a .NET application to create and modify datasets directly in the Power BI Service.
The Tabular Object Model (TOM) is a .NET library that provides an abstract layer on top of the XMLA endpoint. It allows developers to write code in terms of a intuitive programming model that includes classes like Model, Table, Column and Measure. Behind the scenes, TOM translates the read and write operations in your code into HTTP requests executed against the XMLA endpoint.
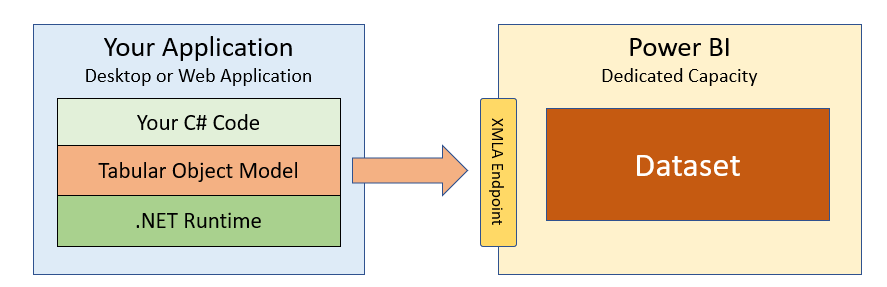
The focus of this article is getting started with TOM and demonstrating how to write the C# code required to create and modify datasets while they're running in the Power BI Service. However, you should note that TOM can also be used in scenarios that do not involve the XMLA endpoint such as when programming against a local dataset running in Power BI Desktop. You can read through Phil Seamark's blog series and watch the video from the Power BI Dev Camp titled How to Program Datasets using the Tabular Object Model (TOM) to learn more about using TOM with Power BI Desktop.
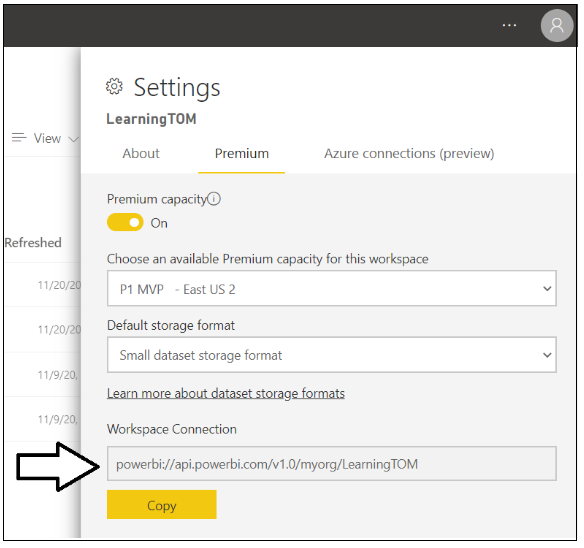
The first thing you need to get before you can program with TOM is the URL for a workspace connection. The workspace connection URL references a specific workspace and is used to create a connection string that allows your code to connect to that Power BI workspace and the datasets running inside. Start by navigating to the Settings page of a Power BI workspace running in a dedicated capacity.

Once you navigate to the Premium tab of the Settings pane, you can copy the Workspace Connection URL to the clipboard.
The next step is to create a new .NET application in which you will write the C# code that programs using TOM. You can create a Web application or a Desktop application using .NET 5, .NET Core 3.1 or older versions on the .NET Framework. In this article we will create a simple C# console application using the .NET 5 SDK.
Begin by using the .NET CLI to create a new console application.
dotnet new console --nameThe next thing you need to do is to add the NuGet package which contains the Tabular Object Model (TOM). The name of this NuGet package is Microsoft.AnalysisServices.AdomdClient.NetCore.retail.amd64 and you can install this package in a .NET 5 application using the following .NET CLI command.
dotnet add package Microsoft.AnalysisServices.AdomdClient.NetCore.retail.amd64Once your project has the NuGet package for the TOM library installed, you can write the traditional Hello World application with TOM that connects to a Power BI workspace using the Workspace Connection URL and then enumerates through the datasets in the workspace and displays their names in the console window.
using System;
using Microsoft.AnalysisServices.Tabular;

class Program {
  static void Main() {

    // create the connect string
    string workspaceConnection = "powerbi://api.powerbi.com/v1.0/myorg/LearningTOM";
    tring connectString = $"DataSource={workspaceConnection};";

    // connect to the Power BI workspace referenced in connect string
    Server server = new Server();
    server.Connect(connectString);

    // enumerate through datasets in workspace to display thier names
    foreach (Database database in server.Databases) {
      Console.WriteLine(database.Name);
    }
  }
}
Note that the connect string in this example contains the Workspace Connection URL but no information about the user. If you run the console application with this code, the application will begin to run and then you'll be prompted with a browser-based window to login in. If you log in with a user account that has permissions to access the workspace referenced by the Workspace Connection URL, the TOM library is able to acquire an access token, connect to the Power BI Service and enumerate through the datasets in the workspace.
For development and testing scenarios where security is not as critical, you can hard-code your user name and password into the code to eliminate the need to log in interactively each time you run a program to test your code.
string workspaceConnection = "powerbi://api.powerbi.com/v1.0/myorg/YOUR_WORKSPACE";
string userId = "YOUR_USER_NAME";
string password = "YOUR_USER_PASSWORD";
string connectStringUser = $"DataSource={workspaceConnection};User ID={userId};Password={password};";
server.Connect(connectStringUser);
Note that it is not only possible but also quite easy to authenticate as the service principal instead of as a user. If you have created an Azure AD application with an Application ID and an application secret, you can authenticate your code to run as the service principal for the Azure AD application using the following code.
string workspaceConnection = "powerbi://api.powerbi.com/v1.0/myorg/YOUR_WORKSPACE";
string tenantId = "YOUR_TENANT_ID";
string appId = "YOUR_APP_ID";
tring appSecret = "YOUR_APP_SECRET";
string connectStringApp = $"DataSource={workspaceConnection};User ID=app:{appId}@{tenantId};Password={appSecret};";
server.Connect(connectStringApp);TOM also provides the flexibility of establishing a connection using a valid Azure AD access token. If you have the developer skills to implement an authentiation flow with Azure AD and acquire access tokens, you can format your TOM connection string without a user name but instead to include the access token as the password.
public static void ConnectToPowerBIAsUser() {
  string workspaceConnection = "powerbi://api.powerbi.com/v1.0/myorg/YOUR_WORKSPACE";
  string accessToken = TokenManager.GetAccessToken();  // you must implement GetAccessToken yourself
  string connectStringUser = $"DataSource={workspaceConnection};Password={accessToken};";
  server.Connect(connectStringUser);
}
If you are acquiring a user-based access token to connect to a Power BI workspace with TOM, make sure to request the following delegated permissions when acquiring access token to ensure you have all the authoring permissions you need.
public static readonly string[] XmlaScopes = new string[] {
    "https://analysis.windows.net/powerbi/api/Content.Create",
    "https://analysis.windows.net/powerbi/api/Dataset.ReadWrite.All",
    "https://analysis.windows.net/powerbi/api/Workspace.ReadWrite.All",
};
If you've been programming with the Power BI REST API, you might recognize familiar permissions such as Content.Create, Dataset.ReadWrite.All and Workspace.ReadWrite.All. An interesting observation is that TOM uses the same set of delegated permissions as the Power BI REST API defined within the scope of the Azure AD resource ID of https://analysis.windows.net/powerbi/api.
The fact that both the XMLA endpoint and the Power BI REST API share the same set of delegated permissions has its benefits. Access tokens can be used interchangeably between TOM and the Power BI REST API. Once you have acquired an access token to call into TOM to create a new dataset, you can use the exact same access token to call the Power BI REST API to set the datasource credentials which is discussed later in this article.
The object model in TOM is based on a hierarchy with top-level Server object which contains a collection of Database objects. When programing with TOM in Power BI, the Server object represents a Power BI workspace and the Database object represents a Power BI dataset.
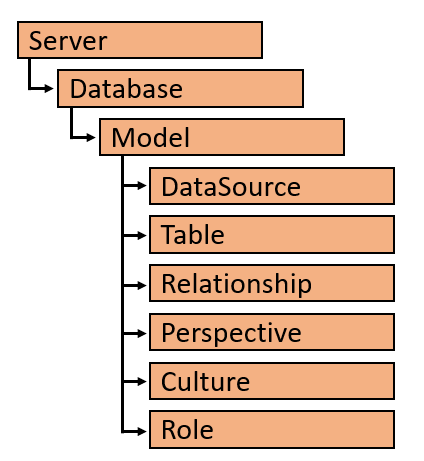
Each Database contains a Model object which provides read/write access to the data model associated with a Power BI dataset. The Model contains collections for the elements of a data model including DataSource, Table, Relationship, Perspective, Culture and Role.
As shown in the Hello World code listing, once you call server.Connect, you can easily discover what datasets exist inside a Power BI workspace by enumerating through the Databases collection of the Server object.
foreach (Database database in server.Databases) {
    Console.WriteLine(database.Name);
}
You can also use the GetByName method exposed by the Databases collection object to access a dataset by its name.
Database database = server.Databases.GetByName("Wingtip Sales");It is important to distinguish between a Database object and its inner Model property. You can use Database object properties to discover dataset attributes such as Name, ID, CompatibilityMode and CompatibilityLevel. There is also an EstimatedSize property which makes it possible to discover how big a dataset has grown. Other significant properties include LastUpdate, LastProcessed and LastSchemaUpdate which allow you to determine when the underlying dataset was last refreshed and when the dataset schema was lasted updated.
public static void GetDatabaseInfo(string DatabaseName) {
  Database database = server.Databases.GetByName(DatabaseName);
  Console.WriteLine("Name: " + database.Name);
  Console.WriteLine("ID: " + database.ID);
  Console.WriteLine("CompatibilityMode: " + database.CompatibilityMode);
  Console.WriteLine("CompatibilityLevel: " + database.CompatibilityLevel);
  Console.WriteLine("EstimatedSize: " + database.EstimatedSize);
  Console.WriteLine("LastUpdated: " + database.LastUpdate);
  Console.WriteLine("LastProcessed: " + database.LastProcessed);
  Console.WriteLine("LastSchemaUpdate: " + database.LastSchemaUpdate);
}
While the Database object has its own properties, it is the inner Model object of a Database object that provides you with the ability to read and write to a dataset's underlying data model. Here is a simple example of programming the database Model object to enumerate through its Tables collection and discover what tables are inside.
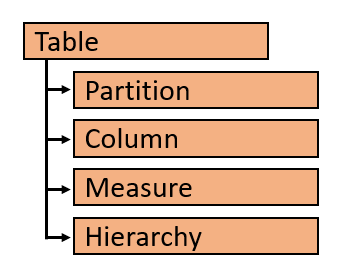
In the TOM object model, each Table object has collections objects for its partitions. columns, measures and hierarchies.
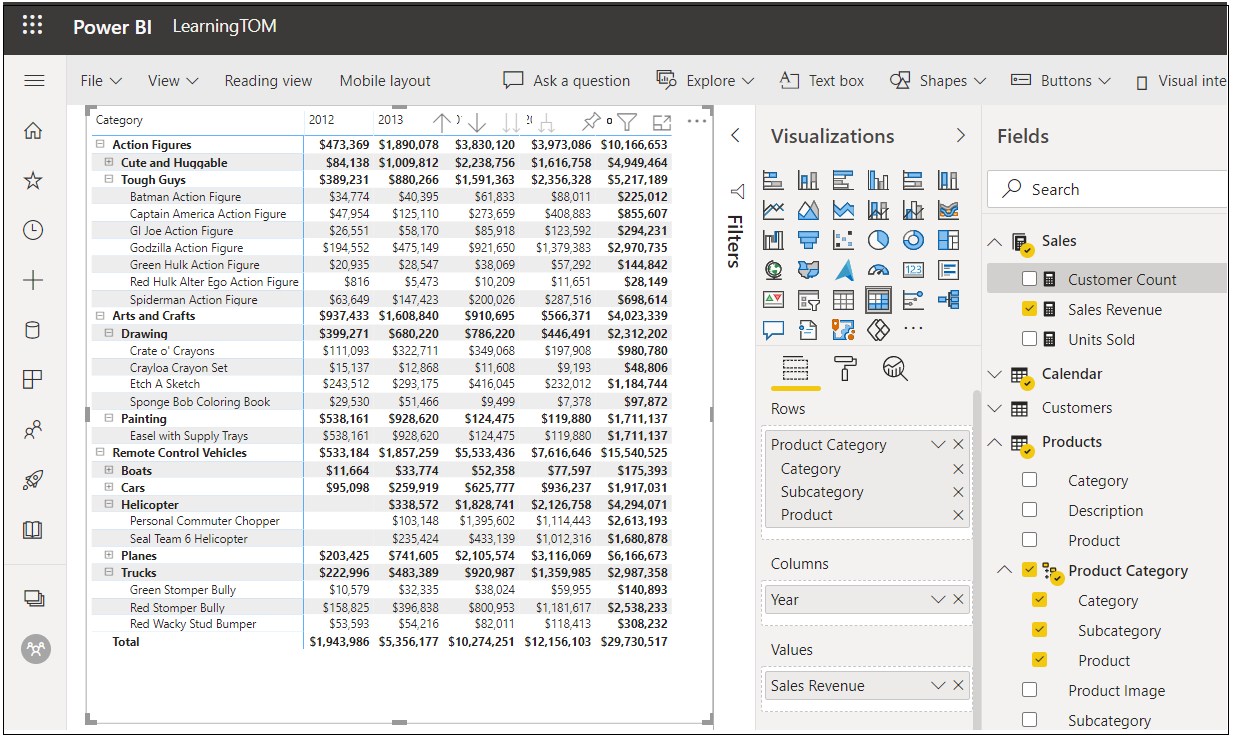
Once you have retrieved the Model object for a Database, you can access a specific table by name in the model using the Find method of the Tables collection. Here is an example retrieving a table named Sales and discovering its members by enumerating through its Columns collection and its Measures collection.
Model databaseModel = server.Databases.GetByName("Tom Demo").Model;

Table tableSales = databaseModel.Tables.Find("Sales");

foreach (Column column in tableSales.Columns) {
  Console.WriteLine("Coulumn: " + column.Name);
}

foreach (Measure measure in tableSales.Measures) {
  Console.WriteLine("Measure: " + measure.Name);
  Console.WriteLine(measure.Expression);
}Up to this point, you have seen how to access a Database object and its inner Model object to inspect the data model of a dataset running in the Power BI Service. Now it's time to program our first dataset update using TOM by adding a measure to a table.
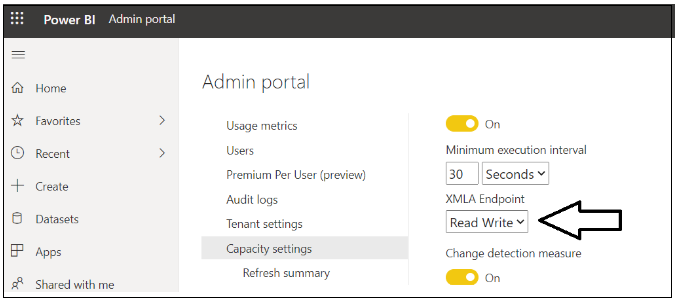
Remember that the XMLA endpoint you are using must be configured for read/write access. By default, the XMLA endpoint permission setting is set to Read, so it must be explicitly set to Read Write by someone with Capacity Admin permissions. This setting can be viewed and updated in the Capacity settings page in the Admin portal.
Once the XMLA endpoint has been configured with read/write access, you can write the following code to add a new measure named Sales Revenue to the Sales table.
Model dataset = server.Databases.GetByName("Tom Demo Starter").Model;
Table tableSales = dataset.Tables.Find("Sales");
Measure salesRevenue = new Measure();
salesRevenue.Name = "Sales Revenue";
salesRevenue.Expression = "SUM(Sales[SalesAmount])";
salesRevenue.FormatString = "$#,##0.00";
tableSales.Measures.Add(salesRevenue);
dataset.SaveChanges();
Let's walk through this code. First, you create a new Measure object using the C# new operator and provide values for the Name, Expression and a FormatString. Second, you add the new Measure object to the Measures collection of the target Table object by calling the Add method. Finally, call the SaveChanges method of the Model object to write your changes back to the dataset in the Power BI Service.
Keep in mind that updates to a dataset are batched in memory until you call SaveChanges. Imagine a scenario where you'd like to hide every column in a table. You can start by writing a foreach loop to enumerate through all the Column objects for a table and setting the IsHidden property for each Column object to true. After the foreach loop completes, you have several column updates that are batched in memory. It's the final call to SaveChanges that push all the changes back to the Power BI Service in a batch.
Model dataset = server.Databases.GetByName("Tom Demo").Model;
Table tableSales = dataset.Tables.Find("Sales");

foreach (Column column in tableSales.Columns) {
  column.IsHidden = true;
}

dataset.SaveChanges();
Let's say you want to update the FormatString property for an existing column. The Columns collection exposed a Find method to retrieve the target Column object. After that, it's just a matter of setting the FormatString property and calling SaveChanges.
Model dataset = server.Databases.GetByName("Tom Demo").Model;
Table tableSales = dataset.Tables.Find("Products");
Column columnListPrice = tableSales.Columns.Find("List Price");
columnListPrice.FormatString = "$#,##0.00";
dataset.SaveChanges();Database database = server.Databases.GetByName("Tom Demo Starter");
Model datasetModel = database.Model;
foreach (Table table in datasetModel.Tables) {
foreach (Column column in table.Columns) {
if(column.DataType == DataType.DateTime) {
column.FormatString = "yyyy-MM-dd";
}
}
}
datasetModel.SaveChanges();Now let’s perform a typical dataset maintenance operation. As you can see, it's not very complicated to start a dataset refresh operation using TOM.
public static void RefreshDatabaseModel(string Name) {
  Database database = server.Databases.GetByName(Name);
  database.Model.RequestRefresh(RefreshType.DataOnly);
  database.Model.SaveChanges();
}
One strange thing to call out is that dataset refresh operations initiated through the XMLA endpoint do not show up in the Power BI Service. For example, imagine you start a refresh operation with TOM and then you navigate to the Power BI Service and you inspect the dataset refresh history. You will not see any refresh operations initiated by TOM. However, when you inspect the data in the dataset you will see that the refresh operation did actually take place.
Imagine you have a requirement to create and clone Power BI datasets using code written in C#. Let’s begin by writing a reusable function named CreateDatabase that creates a new Database object.
public static Database CreateDatabase(string DatabaseName) {

  string newDatabaseName = server.Databases.GetNewName(DatabaseName);
  var database = new Database() {
    Name = newDatabaseName,
    ID = newDatabaseName,
    CompatibilityLevel = 1520,
    StorageEngineUsed = Microsoft.AnalysisServices.StorageEngineUsed.TabularMetadata,
    Model = new Model() {
      Name = DatabaseName + "-Model",
      Description = "A Demo Tabular data model with 1520 compatibility level."
    }
  };

  server.Databases.Add(database);
  database.Update(Microsoft.AnalysisServices.UpdateOptions.ExpandFull);
  return database;

}
In this example we will start by using the GetNewName method of the Databases collection object to ensure our new dataset name is unique within the target workspace. After that, the Datasbase object and its inner Model object can be created using the C# new operator as shown in the following code. At the end, this method adds the new Database object to the Databases collection and calls the database.Update method.
If your goal is to copy an existing dataset instead of creating a new one, you can use the following CopyDatabase method to clone a Power BI dataset by creating a new empty dataset and then calling CopyTo on the Model object for the source dataset to copy the entire data model into the newly created dataset.
public static Database CopyDatabase(string sourceDatabaseName, string DatabaseName) {
  Database sourceDatabase = server.Databases.GetByName(sourceDatabaseName);
  string newDatabaseName = server.Databases.GetNewName(DatabaseName);
  Database targetDatabase = CreateDatabase(newDatabaseName);
  sourceDatabase.Model.CopyTo(targetDatabase.Model);
  targetDatabase.Model.SaveChanges();
  targetDatabase.Model.RequestRefresh(RefreshType.Full);
  targetDatabase.Model.SaveChanges();
  return targetDatabase;
}OK, now imagine you have just created a new dataset from scratch and now you need to use TOM to compose a real-world data model by adding tables, columns, measures, hierarchies and table relationships. Let's see an example of creating a new table with code that includes defining columns, adding a three-level dimensional hierarchy and even supplying the M code for the underlying table query.
private static Table CreateProductsTable() {

  Table productsTable = new Table() {
    Name = "Products",
    Description = "Products table",
    Partitions = {
      new Partition() {
        Name = "All Products",
        Mode = ModeType.Import,
        Source = new MPartitionSource() {
          // M code for query maintained in separate source file
          Expression = Properties.Resources.ProductQuery_m
        }
      }
    },
    Columns = {
      new DataColumn() { Name = "ProductId", DataType = DataType.Int64, SourceColumn = "ProductId", IsHidden = true },
      new DataColumn() { Name = "Product", DataType = DataType.String, SourceColumn = "Product" },
      new DataColumn() { Name = "Description", DataType = DataType.String, SourceColumn = "Description" },
      new DataColumn() { Name = "Category", DataType = DataType.String, SourceColumn = "Category" },
      new DataColumn() { Name = "Subcategory", DataType = DataType.String, SourceColumn = "Subcategory" },
      new DataColumn() { Name = "Product Image", DataType = DataType.String,
                        SourceColumn = "ProductImageUrl", DataCategory = "ImageUrl" }
     }
  };

  productsTable.Hierarchies.Add(
    new Hierarchy() {
      Name = "Product Category",
      Levels = {
        new Level() { Ordinal=0, Name="Category", Column=productsTable.Columns["Category"] },
        new Level() { Ordinal=1, Name="Subcategory", Column=productsTable.Columns["Subcategory"] },
        new Level() { Ordinal=2, Name="Product", Column=productsTable.Columns["Product"] }
      }
  });

  return productsTable;
}
Once you have created a set of helper methods to create the tables, you can compose them together to create a data model.
Model model = database.Model;
Table tableCustomers = CreateCustomersTable();
Table tableProducts = CreateProductsTable();
Table tableSales = CreateSalesTable();
Table tableCalendar = CreateCalendarTable();
model.Tables.Add(tableCustomers);
model.Tables.Add(tableProducts);
model.Tables.Add(tableSales);
model.Tables.Add(tableCalendar);model.Relationships.Add(new SingleColumnRelationship {
Name = "Products to Sales",
ToColumn = tableProducts.Columns["ProductId"],
ToCardinality = RelationshipEndCardinality.One,
FromColumn = tableSales.Columns["ProductId"],
FromCardinality = RelationshipEndCardinality.Many
});After you are done adding the tables and table relationship you can save your work with a call to model.SaveChanges.
model.SaveChanges();At this point, after calling SaveChanges, you should be able to see the new dataset created in the Power BI Service and begin using it to create new reports.
The sample project with the C# code you've seen in this article is available here. Now it's time for you to start programming with TOM and to find ways to leverage this powerful new API in the development of custom solutons for Power BI.